
Last Updated on June 24, 2026
After you have installed COS software on a COS – SD, you must create an initial COS Configuration to use COS with your Testing Devices. This Quick Tour describes how to create the initial COS Configuration. DRC provides the Configure Central Office Services page to help you with this process.
To access the Configure Central Office Services page, you must log in to your state’s Portal page (WIDA AMS for WIDA testing). When you finish installing the COS – SD software, the Central Office Setup Sign In window displays. Sign in to the DRC INSIGHT Portal by entering your username and password and clicking Sign In.
Note: If this is the first time you’ve logged in to the Portal, the End User License Agreement for DRC – SD Software window displays. Read the agreement, check the I Agree checkbox, and click Accept to continue.
When the Configure Central Office Services page displays, you are ready to create the COS Configuration. If the Configure Central Office Services page does not display, enter or paste the URL that you saved or copied when you installed the COS – SD software.
- On the Configure Central Office Service page, enter the name for the COS – SD into the Service Device Name field to help you identify it in the COS Dashboard. The name displays anytime you view the device in COS. If you do not name the COS – SD, only the Device ID generated by DRC displays.
- Important: For COS – SDs that are part of a pool of devices (including load‑balanced pools), if you have already configured a COS – SD and want to use the same COS Configuration for this COS – SD, you can reply Yes to Use an existing COS Configuration? For more information, see Creating COS Service Device Pools.
- Enter the name of the COS Configuration you are creating in the Configuration Name field.
- To enable automatic software updates of DRC INSIGHT, check the Enable Auto Updates for testing devices checkbox. DRC recommends using this option for testing.
- Note: This feature is not supported for Linux or macOS.
- If you select this option, DRC updates the DRC INSIGHT software automatically (if the Testing Device is on and connected to the network).
- If you do not select this option, DRC notifies you whenever an update to the DRC INSIGHT software is available and you must update the Testing Device software manually.
- To use a proxy host server, check the Use Proxy Host checkbox and enter the server name (or IP address) and port number, separated by a colon, followed by a forward slash (/), in the Proxy Path field. To use a restricted proxy host, after you complete the COS Configuration, you must update it and activate the restricted proxy host. For more information on using a proxy host or restricted proxy host see Specifying a Proxy Host or Restricted Proxy Host.
- To enable automatic software updates of DRC INSIGHT, check the Enable Auto Updates for testing devices checkbox. DRC recommends using this option for testing.
- Select a testing program from the Testing Program filter. Then click Select a Site and start typing a district name, school name, or site code in the Site Search filter. Click Select when you locate the district or school name to which you want to register the COS Configuration and its associated COS – SDs and Testing Devices.
- Important: You can select a site for which you have access as defined by the Central Office Services permission. If you add the wrong location, you can click Remove (to the right of the location) to remove it.
- Click Add Site to add your testing program location.
- To enable Content Management, check the Enable Content Management checkbox, the Admin checkbox (if unchecked), and the checkbox for the correct testing administration(s). Indicate whether you need TTS/HVA (audio) and/or VSL (video) test content by checking the appropriate checkboxes based on your state’s requirements for the test administration. The test content for the selected administrations and accommodations will be downloaded automatically to your COS – SD. To save space on the COS – SD, do not select unneeded administrations or accommodations.
- If you enabled Content Management, check the Enable Content Hosting checkbox to activate Content Hosting.
- Important: Content Management must be enabled to activate Content Hosting. Your state may have a requirement to use Content Management for your testing program.
- Click Complete. When the Confirm Configuration dialog box displays, review your COS Configuration. If it is correct, click Save. If you need to make changes, click Edit Configuration.
- The COS Configuration that you just created is displayed in the COS Dashboard. Copy and save the Org Unit ID. You use this ID to register your devices for testing in Step 10.
- Choose what to do depending on whether DRC INSIGHT is already installed on the Testing Device.
- If DRC INSIGHT is not installed, install it on the Testing Device (see Volume III: DRC INSIGHT in your DRC INSIGHT Technology User Guide).
- If DRC INSIGHT is installed, you can use the version of DRC INSIGHT that is installed.
- Start DRC INSIGHT on the Testing Device. Because the Testing Device is not registered with COS, the Configuration Not Found screen is displayed when you start DRC INSIGHT. Click Assign Device to Org Unit.

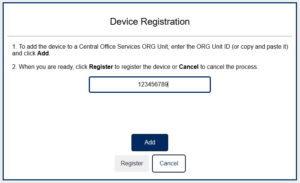
- When the Device Registration page displays, enter or paste the device’s Org Unit ID that you saved in Step 7 and click Add. After you have added the Org Unit ID, click Register. After the Testing Device is successfully registered, it will be displayed on the COS Testing Devices page.
- Depending on what you specified when you installed DRC INSIGHT, either the System Information Page of the System Readiness Check or the main DRC INSIGHT landing page displays. If you need to start the System Readiness Check, click the Readiness Check link in the top-right corner of the main DRC INSIGHT screen. When prompted, enter 7745 for the access code and click Submit.
- When the System Readiness Check displays, verify that the icons in the Required Test List section are green, which indicates whether everything is set up correctly (for more information, refer to the various System Readiness Check topics in Volume III: DRC INSIGHT in your DRC INSIGHT Technology User Guide).
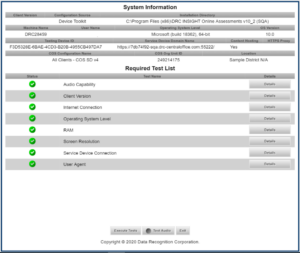
- Click Exit to exit the System Readiness Check and display the main DRC INSIGHT landing page.