
Last Updated on June 24, 2026
COS Version 10 for Windows
All supported versions of Windows may require additional manual steps due to security updates to the COS maintenance tool. If you are completing a fresh installation – not trying to update from version 9 to 10 – you should not need to complete the additional steps unless you receive an error.
For more information, see Fixing Cache Issues with the COS Maintenance Tool for Windows.
Quick Tour: Installing COS – SD Software on Windows Devices
Important: To access COS, you must have the Test Setup – Central Office Services permission.
- To launch the wizard and start the installation on a Windows device that meets the COS – SD system requirements, sign in to your state’s Portal site, or WIDA AMS for WIDA testing, select MY APPLICATIONS–General Information–Downloads, and click the Central Office Services (COS) Installer icon () to download the COS – SD installer (coinstaller.exe).
- After you have downloaded the file, double‑click on the coinstaller.exe file to start the installation wizard. When the Setup – Central Office window displays, click Next to continue.
- The Installation Folder window displays. You must indicate where to install the COS – SD software and where to store downloaded content.
- The default location for the COS – SD software is C:\Program Files\CentralOffice and the default location for the COS – SD software to store downloaded test content is C:\Program Files\CentralOffice\content_fs.
- Click Next to select the default locations or Browse… to select different locations. DRC recommends using the default locations.
- The Proxy Host window displays. This window allows you to specify a separate proxy server for the COS – SD. This step is optional.
- If you are not planning to use a proxy server, leave the field blank and click Next.
- If you are planning to use a proxy server, enter the URL of the server in the Proxy Host field and click Next. If your COS – SDs and Testing Devices are already using a proxy server, you do not need to use the COS – SD to restrict traffic to or from the Internet and you do not need to set up another proxy server for the COS – SD.
- The Ready to Install window displays. The window indicates the amount of disk space the installation will require. Ensure there is a sufficient amount of disk space to continue with the installation. Click Install to continue or Cancel to exit the installation.
- The Installing Central Office window displays, indicating the progress of the installation.
Note: The installation process can take 5–10 minutes. - The Configure Service Ports window displays. On this window you specify the port to use for Content Hosting (labeled as the Base port). The COS application uses the base port to determine which ports to use for the Content Downloading, Relay, and Restricted Proxy services (labeled the Additional ports).
- The ports are four consecutive numbers, but you need to enter only the base port number in the Base port field. After you specify the base port, COS automatically selects the next three consecutively numbered ports. COS requires four port numbers even if the device being configured will not use all of them.
- The default port values are 55222, 55223, 55224, and 55225. You may select alternate ports, but DRC recommends using the default ports. Make sure the ports you select are properly allowlisted (for more allowlisting information, see Network Requirements for Testing Computers in Volume I: Introduction to Online Testing).
- After you select your base ports, click Test to verify that the ports selected are available on the device.
- If the Installer dialog box indicates that the ports are available, click OK and Next (or click Cancel to exit the installation).
- If the Installer dialog box indicates that the ports are not available, select a different base port and repeat this step until you have ports that are available.
- Important: The ports you select may be blocked at the time of testing despite being available during installation. At testing time, verify that these ports are available and allowlisted on your COS – SD’s firewall. If the ports are blocked and/or not allowlisted, the Testing Device will encounter a Connection Error that will prevent it from being used for testing.To avoid conflicts and to verify that no other device is using these ports, you can enter the command netstat -a from a command prompt to display a list of the ports currently being used.
- The Completing the Central Office Wizard window displays.
- Important: From the Completing the Central Office Wizard window highlight, copy, and save the URL that displays—you can use it to resume the process at this point (if necessary) without reinstalling the COS – SD software.
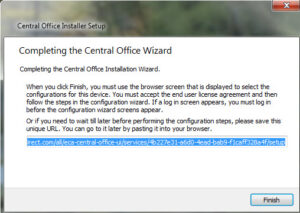
Click Finish in the Completing the Central Office Wizard window. To complete the process of configuring your COS – SD, see Creating the Initial COS Configuration.
- Important: From the Completing the Central Office Wizard window highlight, copy, and save the URL that displays—you can use it to resume the process at this point (if necessary) without reinstalling the COS – SD software.
Fixing Cache Issues with the COS Maintenance Tool for Windows
All supported versions of Windows may require additional manual steps to install Version 10 of the COS software due to security updates to the COS maintenance tool.
You must clear the local cache in order to update to Version 10 of the COS – SD software if you encounter one of the following errors:
- Error while copying item to path… Cannot remove directory… Clearing the cache directory and restarting the application may solve this.
- Warning: Cannot open “C:/Users/<user>/AppData/Local/cache/qt-installer-framework” for reading: “Access is denied.”
These errors are typically caused by corrupted or inaccessible local cache files used by the Qt Installer Framework. There are two methods you may use to clear the local cache files.
Method 1 – Clear the Cache Using the Maintenance Tool
- From the Program Files folder of the COS – SD, double-click the Central Office folder.
- Double-click the maintenancetool.exe file.
- In the lower-left corner, click Settings
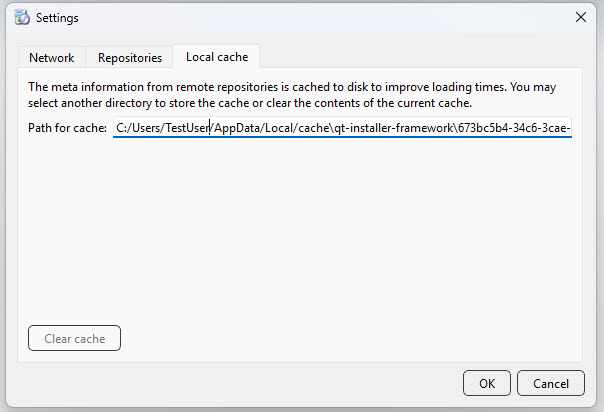
- Click the Local Cache tab.
- Click Clear Cache.
- Click OK.
- Click Quit to close MaintenanceTool.
- Reopen the application and retry the update.
Method 2 – Manually Delete the Cache Directory
- From the Program Files folder of the COS – SD, double-click the Central Office folder.
- Double-click the maintenancetool.exe file.
- Navigate to: Settings–Local Cache.
- In Path for cache field, highlight and copy C:/Users/TestUser/AppData/Local
- Important: In the Path for cache field, “TestUser” represents the account/user name on the device, and will be replaced with the actual account name where the COS – SD software is installed.
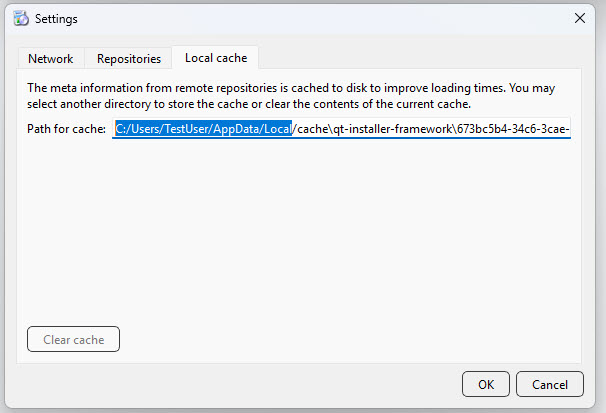
- Important: In the Path for cache field, “TestUser” represents the account/user name on the device, and will be replaced with the actual account name where the COS – SD software is installed.
- Close MaintenanceTool.
- Open File Explorer and browse to the cache path. Delete the contents of the cache directory.
- Restart the application and retry the update.
Manually Updating COS – SD Software on Windows Devices
DRC sends COS – SD software updates automatically at regular intervals. If a COS – SD is turned off when DRC releases an update, the COS – SD will not receive the update until the next time it is turned on at night.
Perform the following steps if you need to manually update the COS – SD software on a Windows machine.
- From the Program Files folder of the COS – SD, double-click the Central Office folder.
- Double-click the maintenancetool.exe file.
- On the Setup – Central Office screen, check Update components and click Next.
- A message displays indicating the results of the update. Click Quit to finish.
Uninstalling the COS – SD Software on Windows Devices
To uninstall the COS – SD software from a Windows machine, perform the following steps.
- From Program Files folder of the COS – SD, double-click the Central Office folder.
- Double-click the maintenancetool.exe file.
- When the Setup – Central Office screen displays, verify that Remove all components is selected and click Next.
- On the Ready to Uninstall screen, click Uninstall. The process takes a few minutes.
Removing Outdated Test Administration Content from the COS – SD
You can remove out-of-date content from past test administrations on the COS – SD.
Test administration content can be added or removed by using the Manage Content feature within the COS dashboard on your state’s Portal site. For more information, see Content Management and Hosting.
To manually remove or verify removal of outdated content, navigate to the C:\Program Files\CentralOffice\content_fs location in the COS – SD and remove the folders that reference test administrations that are out of date.